


How to Unwind Your Hips: 4 Essential Hip Mobility Exercises
Unfortunately, hip pain is a serious issue for many of us. For most, it’s not just a problem to deal with when you’re older, but it can be something that affects your daily routine today.
If you’ve been afflicted with such a problem and need to loosen your hips, then you need to read this guide.
We’ll help you understand how to relax any tight muscles with several hip mobility exercises utilizing only foam rollers.
P.S.---You don’t have to wait for hip pain to kick in to start doing these exercises; they can be a great addition to help prevent future pains and injuries!
Hip Exercises: An Overview of Self Myofacial Release

Poor hip inflexibility and injuries often can come from from sitting around too much without any exercise. In an effort to reduce this we can look at adding Self-Myofascial Release (SMR) techniques to add back needed flexibility and reduce injury rates.
SMR is a self-massage technique that aims to release tight muscles by applying pressure to specific points using tools like foam rollers. It’s a relatively safe and effective method to relieve hip muscle tension. Combined with stretching, foam rollers help to increase flexibility, lower injury risk, and reduce recovery time.
In our case, we can look at hip SMR exercises to target your hips and help loosen the muscles and fascia. Tools like the Helix or Axle do a great job at helping you release the muscles in your hips and allow you to get back to exercising quickly.
4 Hip Mobility Exercises With Foam Rollers
Bring your exercise mat and foam rollers, and pick your favorite exercise from below to start with:
-
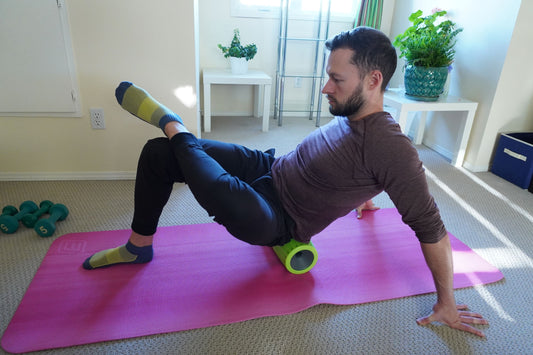
Glute Massage
If you’re a beginner with foam rollers, you should start with this exercise. Place the foam roller beneath one of your glutes and sit on top of it.
This way, half of you is on the roller while your bent leg suspends your body.
Then, slowly move back and forth on the roller, using your hands for support.
Massaging your glutes can help ease tension, increase mobility, and make other exercises easier, such as deadlifting or squatting. I typically use this exercise for warming up the hips with my clients and it can usually help reduce knee pain and make movement much easier.

-
Quad Rolling
Now that you’ve taken care of your glutes, it’s time to look at the quads. The exercise requires placing the roller underneath your quadriceps—your front thigh muscles.
Like the plank position, place your hands on the floor and lift yourself until you’re straight from head to toe. Keep your stomach muscles engaged to avoid overarching your back.
Using your arms, slowly roll your body back and forth, allowing the roller to move from your knees to the bottom of the hip.
If you’d like, you can even bend your legs at the knees to increase the pressure and target the lower portion of the quads and the region near the patella.
When performed for about a minute for each leg, this routine can help relieve tightness and increase blood flow by helping circulation.

-
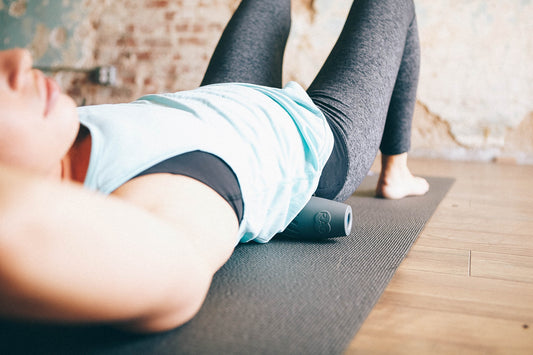
Adductor (Inner Thigh) Rolling
This exercise might be a tad harder than the previous ones, but it’s vital to increase your range of motion.
Begin by lying face down on your mat. Then, raise one leg and bend your knee at approximately a 90-degree angle.
Keep this leg open in a way that leaves your inner thigh facing the ground. Finally, close to the knee, place the foam roller beneath the bent leg.
Once you’re in position, use your forearms and the foot of your straight leg to help keep you balanced as you roll the foam roller up and down.
Just like before, this exercise can help you loosen your hip joints and improve muscle efficiency.
However, this exercise asks you to twist your legs at an odd angle to properly face your inner thigh to the floor. Hence, it’s best to wait to try this practice until you’ve understood how to handle foam rollers.

-
The Hip Flexors
The hip flexors are a group of muscles located in the front of the hip and upper thigh region. These muscles play a crucial role in the movement of the hip joint and the flexion of the thigh towards the torso.
I like to target the TFL or Tensor Fasciae Latae, which is a hip flexor muscle located on the outer side of the hip. It is a small, flat muscle that runs from the iliac crest (the bony prominence on the upper part of the hip) down to the iliotibial band (IT band), a thick band of connective tissue that runs along the outside of the thigh.
If the TFL tissue is tight it can create issues for many athletes such as runners. This is where you can alleviate the tension with a roller like an Axle when inflamed or tight.
Start by lying on your side with the foam roller under your hip. Stack your legs and feet on each other, and keep your posture straight from waist to foot. For support and balance, use your forearms.
Then, slowly push yourself on the roller to move up and down. This can be a tad challenging, but you’ll need to keep your movements slow, deliberate, and precise to cover the the TFL and loosen up some of the muscles of the hip.

Final Words
So, are you ready to try these hip mobility exercises? If you give them a quick look, you’ll find that they’re not that hard and primarily focus on loosening the hips.
You’re essentially using the foam rollers to create pressure points around your muscles to relieve tension and improve flexibility.
If you practice consistently, you might just see some great results. Good luck, and be careful while working out!

Written by: Mike Hamlin - Mike has been in the training industry since 2008 and is a Certified Strength and Conditioning Coach through the National Strength and Conditioning Association.