


Written By: Roy Choquette CSCS, CES
Whether you use a rope, crash pads, or routes, the biomechanics and loading patterns of both types of climbing on the body’s tissues are similar, so the information contained below is relevant for many styles of rock climbing, including bouldering.
So what can we do to protect our bodies from injury and help us outclimb our friends from decades to come?
Know the Risks
Chronic, repetitive injuries seem to be more frequent than acute injuries for most climbers, but acute injuries tend to be more severe than in other athletic fields when they do occur. Because of intense overloading of the upper extremities, along with contorted positions of the body, there’s a heightened potential for injury that can be directly correlated to frequency. Meaning the more you climb the more likely you are to injure yourself. There are things we can do to protect and bolster ourselves against the potential for injury so we can keep doing what we love.
According to the American College of Sports Medicine, the fingers are the most common site of injury, with previous injury sites being a significant risk factor for reinjury. These common injuries are usually attributed to chronic overuse.
To build on that, the main causes of finger-related injuries include a lack of proper warm-up before training, tissue mobilization, or cooldown afterward, as well as short rest intervals between each workout. This clearly constitutes repetitive overuse. So it stands to reason that we should focus a lot of our efforts on the fingers and hands.
First things first, we can be more proactive and take care of our bodies both before and after climbing. This way we properly warm-up for those tough holds and twisted positions and we aid the body in recovering faster and more efficiently afterward. Shorter recovery time means more climbing and less chance of long term or acute injury. It’s a win-win!
According to a lot of research, and testimonials from climbers, it doesn’t take long to get in a quick and effective warm-up and cool down. The benefits are quite obvious and it only takes about 5-7 minutes on the front and backside of climbing.
Here are a few ideas on what you can do pre and post-climb to help focus on tissue mobilization and proper recovery.
Pre-Climb Routine
Duration: 5-7 minutes
Techniques: Flushing and Pin and Hold
Principles: Self Myofascial Release (SMR) Warm-Up
Hands:
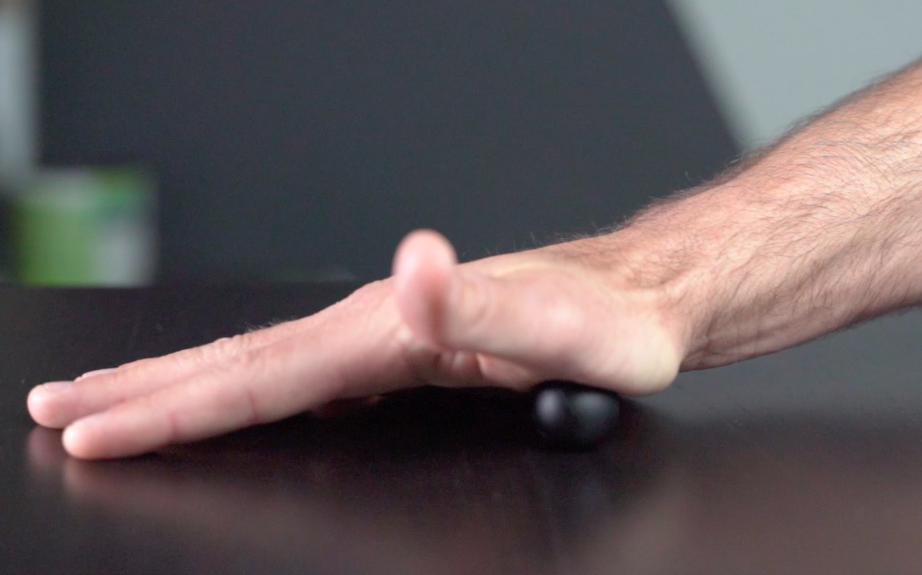
- Using the RAD Micro Round or blue RAD Round in between both hands, start with some light flushing by relaxing the hands as much as possible and moving the Round over the palms and fingers. Do this for 5-10 deep breaths.
- Remember, less is more when it comes to pressure so you don’t want to dig in deep; that’ll likely make the hands constrict more. Just stimulate the hands in order to enhance mobility of tissues and proprioception (huge performance advantage here)
- This will help heat up fluids located in between muscle, fascia, skin, etc. so the tissues can slide and glide easier and you can flex and extend with less effort

Forearms:
- The tissues in the forearms control the wrist and fingers, so this area should never be left out
- You can continue using the Blue or green Round as you did for the hand, or switch it up and use the RAD Rod!
- Sit on the ground and bend one leg inward. Place one handle of your Rod between your calf and hamstring (under the bended knee)
- Use the opposite hand to hold the other end of the Rod
- Then take the forearm that is not being used to hold the rod and flush it over the middle of the Rod, getting both flexor and extensor sides, while taking another 5-10 deep breaths
- Switch forearms and repeat

Feet:
- Grab any one of the Rounds that suits your fancy and feels best
- You can either use your hand/palm to press lightly into the bottom of the foot or use your crash pads as a surface
- Flush from heel to toes, inside and outside of the bottom of the foot, while taking deep breaths
- If you find a spot that feels good and would like to put some more pressure there, pause on that spot and apply pressure and chill out for a bit; this’ll help relieve tension there before climbing.
Post-Climb
Duration: 5-7 minutes
Techniques: Compress and Lengthen
Principles: Self Myofascial Release (SMR) Cool-Down
Flushing for about 1 minute (10 deep breaths) has been shown to increase the temperature of hyaluronic acid by roughly 1 degree Fahrenheit, thereby getting this viscous fluid to “flow” more easily.
This makes flushing an amazing technique for the cool down as well as the pre-climb warm up. To keep things simple and easy to remember, you can repeat the same sequence of routines that you did for your warm-up during your cool down.
Along with the techniques already discussed, I’d also recommend including the Compress and Lengthen technique, which is the final SMR technique we will cover here.
Hands:
- Grab the Micro Round
- Place it near the meaty part of the palm near the thumb
- Compress that spot and then lengthen the tissues by slowly drawing your thumb outward, up, and down; you could also use both hands at the same time on the Round as you did in the warm-up.
- Take 5-10 deep breaths to relax those tissues
- Repeat on the other hand.
This Compress and Lengthen technique enhances your range of motion by getting tissues to easily slide and glide over one another. Once this is done on a regular basis, it’s common for the body to start using this “new” range of motion during your climb. Quite simply, the new mobility becomes your new norm.
Thanks for reading and remember... No brain, no gain! Get rolling and stay RAD.